Fundamentals
Invisible AI
Conversational AI
You've been using AI behind the scenes for classification, summarization, and extraction. Now let's build something that everyone recognizes; a ChatGPT-style conversational interface. Over the next five lessons, you'll start with the fundamentals of streaming chat, then progressively add the features that make these interfaces powerful: professional UI components, system prompts for personality, tool calling to connect with real-world data, and multi-step reasoning with dynamic UI generation.
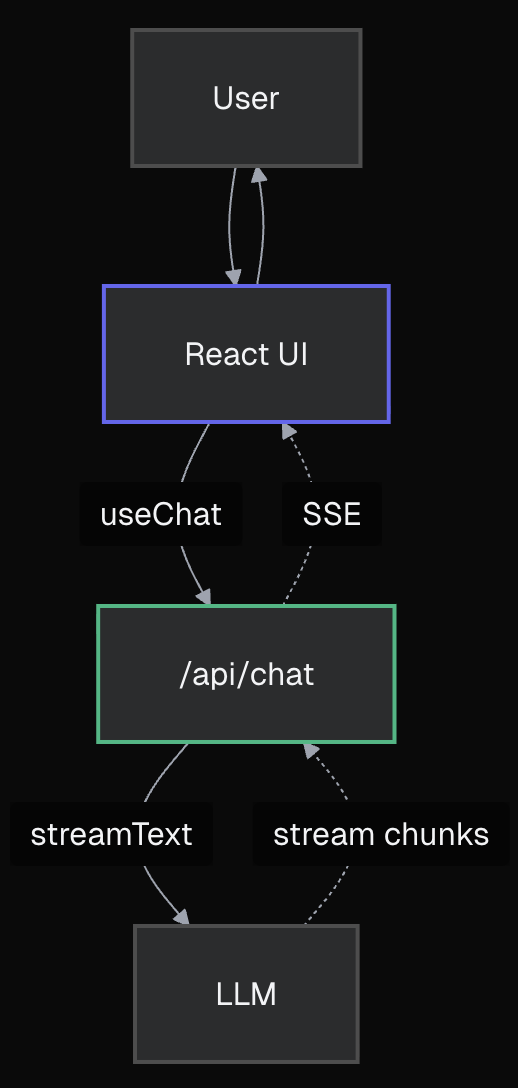
We'll begin with the core architecture that powers every AI chat interface:
streamText.useChat.Project Context
We're working in
app/(5-chatbot)/directory. Same project setup as before, but now we're building both server and client sides.
Your chatbot will have two parts: backend + frontend. The backend connects to the LLM and provides the frontend with an API to use. The backend is required because calling the LLM apis requires secret token, authentication, rate limiting, and other functionality that runs on the server.
The frontend is what the user interacts with in the browser. It's the UI.
First, create the API endpoint that will handle chat requests from your frontend.
What are Next.js Route Handlers?
Route Handlers are serverless endpoints in your Next.js app. They can live anywhere in the
app/directory (not just/api/), though we'll use the/api/convention here. No separate backend needed - perfect for AI functionality.
Create the file: app/api/chat/route.ts
Start with this basic structure:
typescript
typescript
Key components explained:
streamText - Enables real-time streaming from the AI modelconvertToModelMessages - Converts frontend message format to AI model formattoUIMessageStreamResponse() - Formats the stream for the frontend to consumeNow let's build the UI using the useChat hook. Open app/(5-chatbot)/chat/page.tsx and replace the placeholder content.
typescript
typescript
Default API Endpoint
The
useChathook automatically uses/api/chatas its endpoint. If you need a different endpoint or custom transport behavior, check out the transport documentation.
typescript
How it works:
useChat() manages the entire chat state and API communicationmessages contains the conversation historysendMessage() sends user input to your APIparts for different content types (text, tool calls, etc.)The combination of streamText and useChat handles most of the streaming complexity for you - no manual WebSocket management or stream parsing needed.
Run the development server:
bash
Navigate to http://localhost:3000/chat
Try it out - type a message and hit Enter. Watch the AI response appear in real time!
Before moving on, test these scenarios to understand why we need better tooling:
Ask for code: "Write a Python function to calculate fibonacci numbers"
Have a long conversation: Keep chatting until messages go below the fold
Ask for formatted content: "Explain AI with headers and lists"
Refresh the page: All your conversation history disappears
Try to edit a long prompt: The single-line input is limiting
These aren't bugs - they're missing features that every chat interface needs.
Model Choice for Streaming
We use
openai/gpt-4.1for fast, visible streaming responses. Unlike reasoning models likeopenai/gpt-5-mini(which think for 10-15 seconds before streaming),gpt-4.1starts streaming immediately for a responsive user experience. Swap out the model in thestreamTextcall toopenai/gpt-5-minito see the difference.
streamText API route) + Frontend (useChat component)streamText manages server-side AI calls and streaminguseChat handles UI state, messages, and API callstoUIMessageStreamResponse() connects backend to frontendFeeling the Pain Yet?
Notice how much custom code we had to write just for basic functionality? Try having a longer conversation and watch the problems pile up:
Immediate Issues You'll Notice:
- No markdown rendering - If the AI sends code blocks or formatting, they show as raw text
- No auto-scrolling - New messages appear below the viewport, you have to manually scroll
- Basic styling - Just "User:" and "AI:" labels, no proper message bubbles
- Fixed input weirdness - The input floats awkwardly at the bottom
Missing Features You'll Need:
- Loading indicators - No visual feedback while waiting for AI
- Error handling - If the API fails, users see nothing
- Multi-line input - Can't compose longer messages easily
- Message persistence - Refresh = conversation gone
- Code syntax highlighting - Code examples are unreadable
You could spend weeks building all this from scratch... or there might be a better way. 🤔
In the next lesson, we'll discover how to transform this basic chatbot into a professional interface with a single command. Get ready to have your mind blown by AI SDK Elements!
Mark this chapter as finished to continue
Mark this chapter as finished to continue