Fundamentals
Invisible AI
Conversational AI
Your chatbot has personality (system prompts) and a beautiful UI (Elements), but it lacks real-time knowledge. It doesn't know today's weather, can't check prices, or access current data.
Tools let your AI call functions to fetch data, perform calculations, or interact with external APIs. They bridge the gap between the AI's static knowledge and the dynamic real world.
Building on Elements
We'll add tool calling to our Elements-powered chat interface. Building on the basic chatbot and system prompts lessons, we'll extend our chat with real-world data access. The professional UI will make tool invocations visible and interactive!
Base LLMs operate within constraints:
Asking "What's the weather in San Francisco?" fails because the model lacks live data access. The model has no idea what the current weather is in San Francisco. AI is amazing, but the model is always a snapshot of the past.
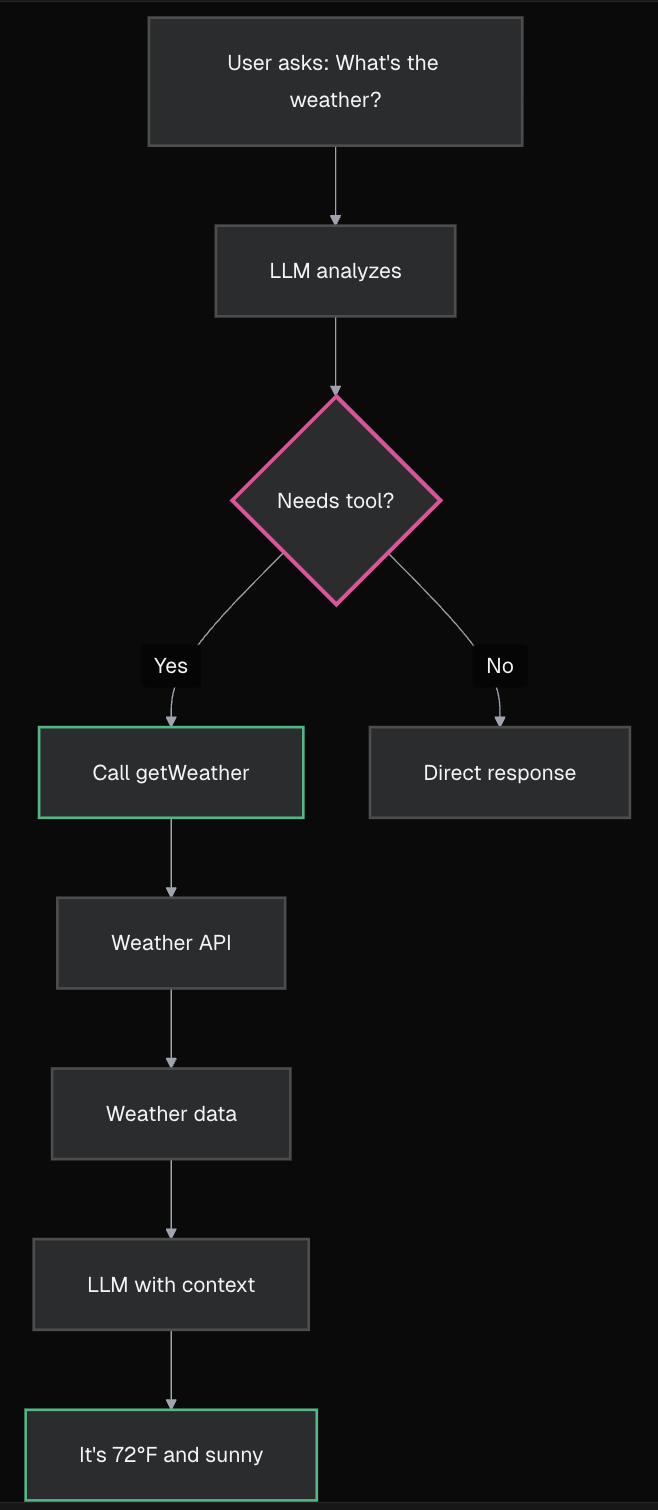
Thankfully this problem can be solved with "tool calling" which gives your model the ability to run code based on your conversation context. The results of these function calls can then be fed back into your prompt context to generate a final response.
Tools allow the model to access functions based on conversation context. They are like a hotline the LLM can pick up, call a pre-defined function, and pop the results back inline.
description.execute function.execute function runs (e.g., calls weather API), returns data.If you've used a coding environment like Cursor, you've seen this flow in action. That's how Cursor and similar tools interact with your codebase.
Remember that tools grant LLMs access to real-time data and action capabilities, dramatically expanding chatbot usefulness.
To see this in action you'll build a tool to check the weather.
getWeather ToolCreate a new file app/api/chat/tools.ts to define our weather tool.
typescript
typescript
The description is what the AI reads to decide if this tool matches the user's request.
Prompt Engineering for Tools
The
descriptionfield is crucial - it's how the AI understands when to use your tool. Be specific and clear:
- ✅ Good: "Get current weather for a specific city. Use when users ask about weather, temperature, or conditions."
- ❌ Bad: "Weather tool"
The AI uses semantic matching between the user's query and your description to decide which tool to call.
typescript
The AI will extract the city name from the user's message and pass it to your tool.
💡 Need Help Designing Tool Schemas?
Unsure about what parameters your tool should accept or how to structure them? Try this:
text
typescript
What just happened?
You built a complete tool in 4 progressive steps:
- Description: Tells the AI when to use this tool
- Input Schema: Defines what parameters the AI should extract
- Execute Function: The actual code that runs when called
- Return Value: Structured data the AI can use in its response
The Open-Meteo API is free and requires no API key - perfect for demos!
Now update your API route to use this tool. Modify app/api/chat/route.ts:
typescript
Key changes:
getWeather tool from ./toolstools: { getWeather } to register it with the AIYour chatbot now has access to the weather tool! Try asking "What's the weather in Tokyo?" - but you'll notice the response shows raw JSON data. Let's fix that next.
With tools enabled, messages now have different parts - some are text, some are tool calls. We need to handle both types.
First, update your message rendering to check the part type. Remember our current code just shows text? Let's evolve it:
typescript
Now let's handle both text AND tool calls. We'll use a switch statement to handle different part types:
typescript
Test it now: Ask "What's the weather in San Francisco?" and you'll see:
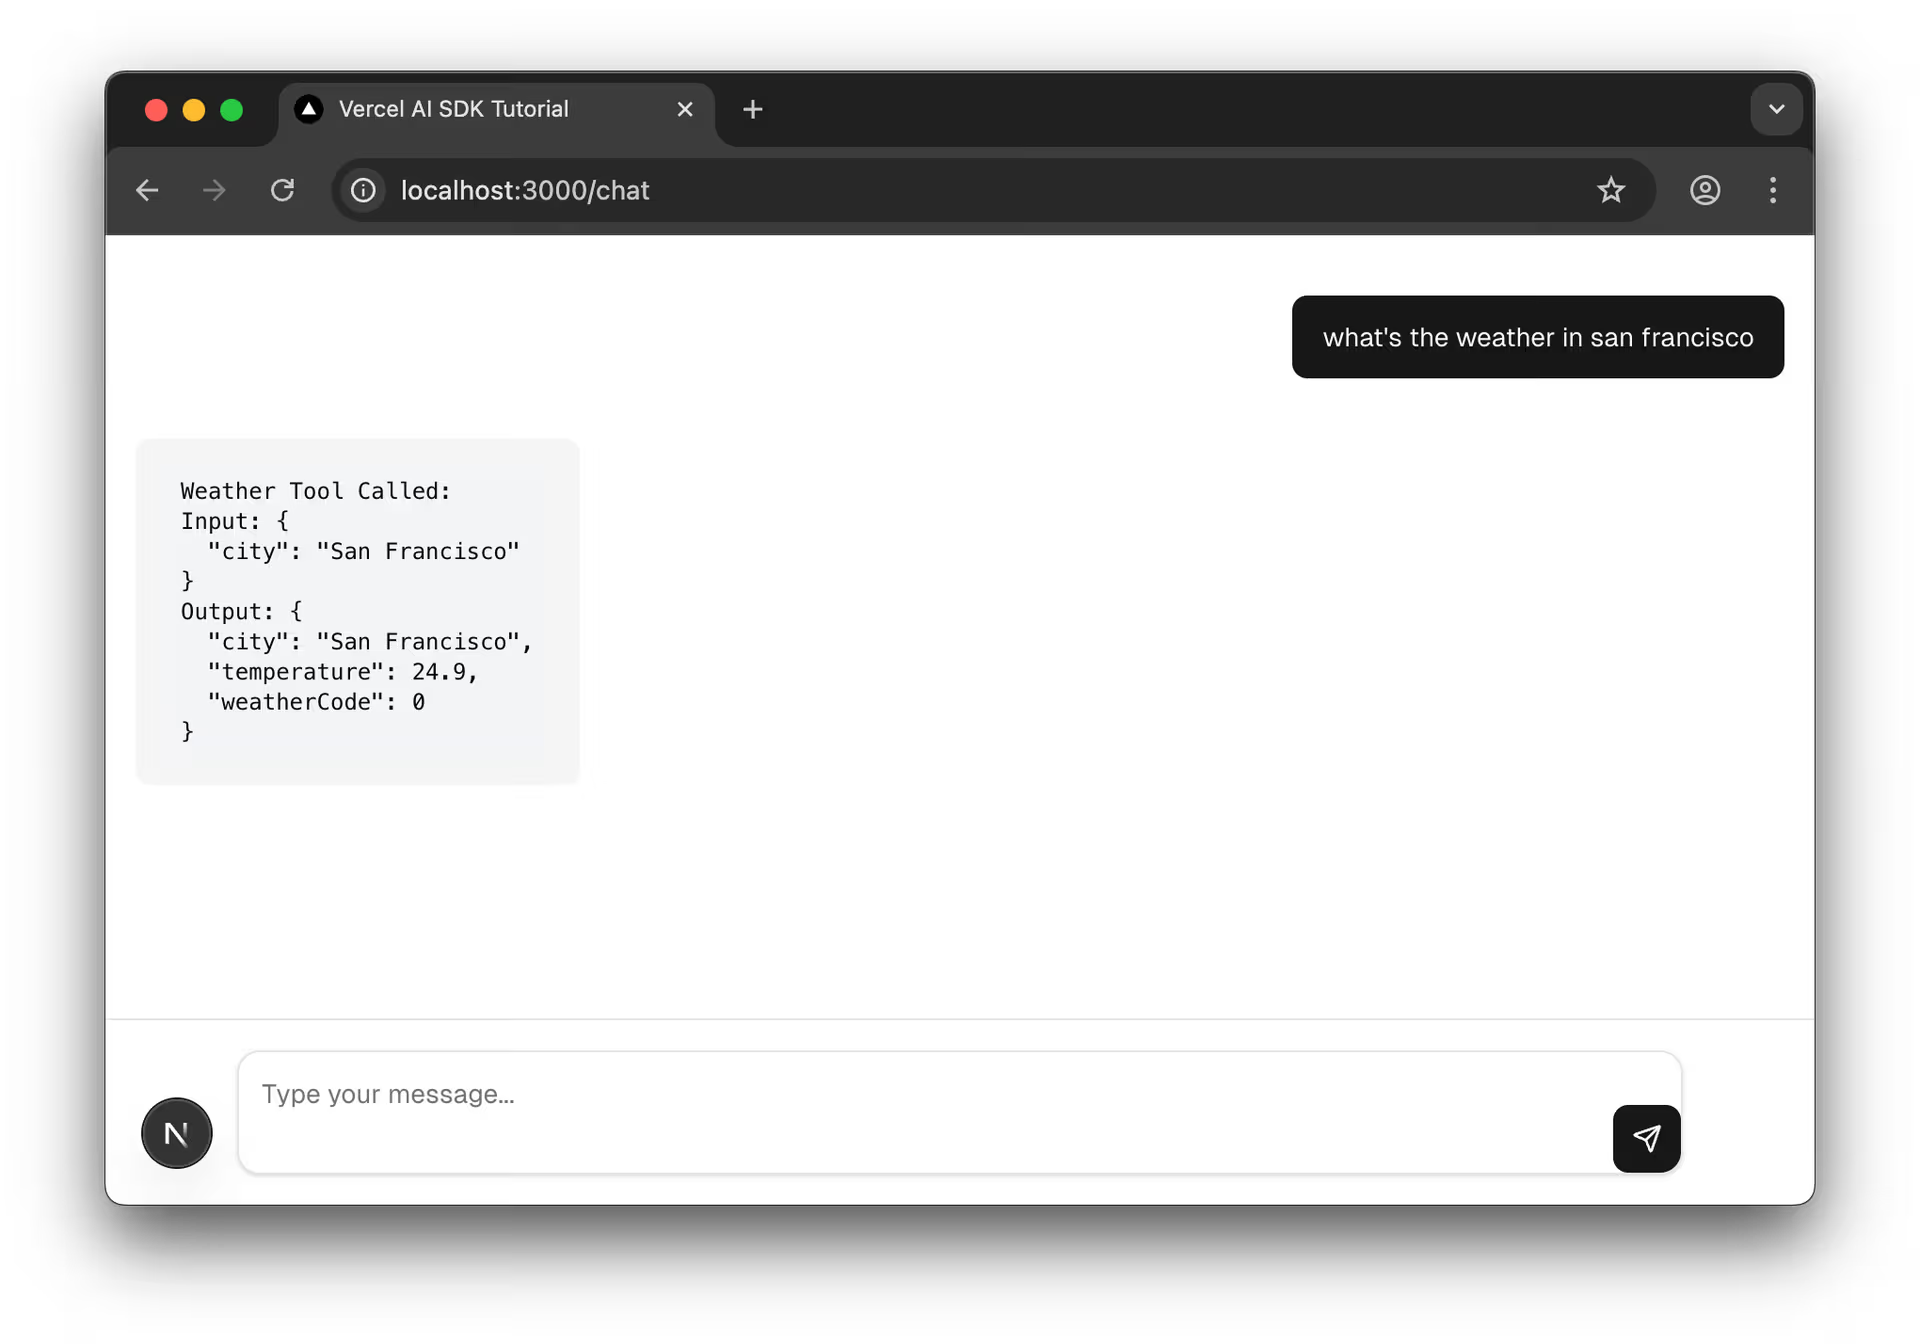
This raw view helps you understand the tool calling flow!
Now that you understand the raw data, let's replace that JSON dump with beautiful Elements components. First, add the Tool imports to your existing imports:
typescript
Then replace your raw JSON display with the Elements components:
typescript
Test it: Ask "What's the weather in San Francisco?" again. Now instead of raw JSON, you'll see:
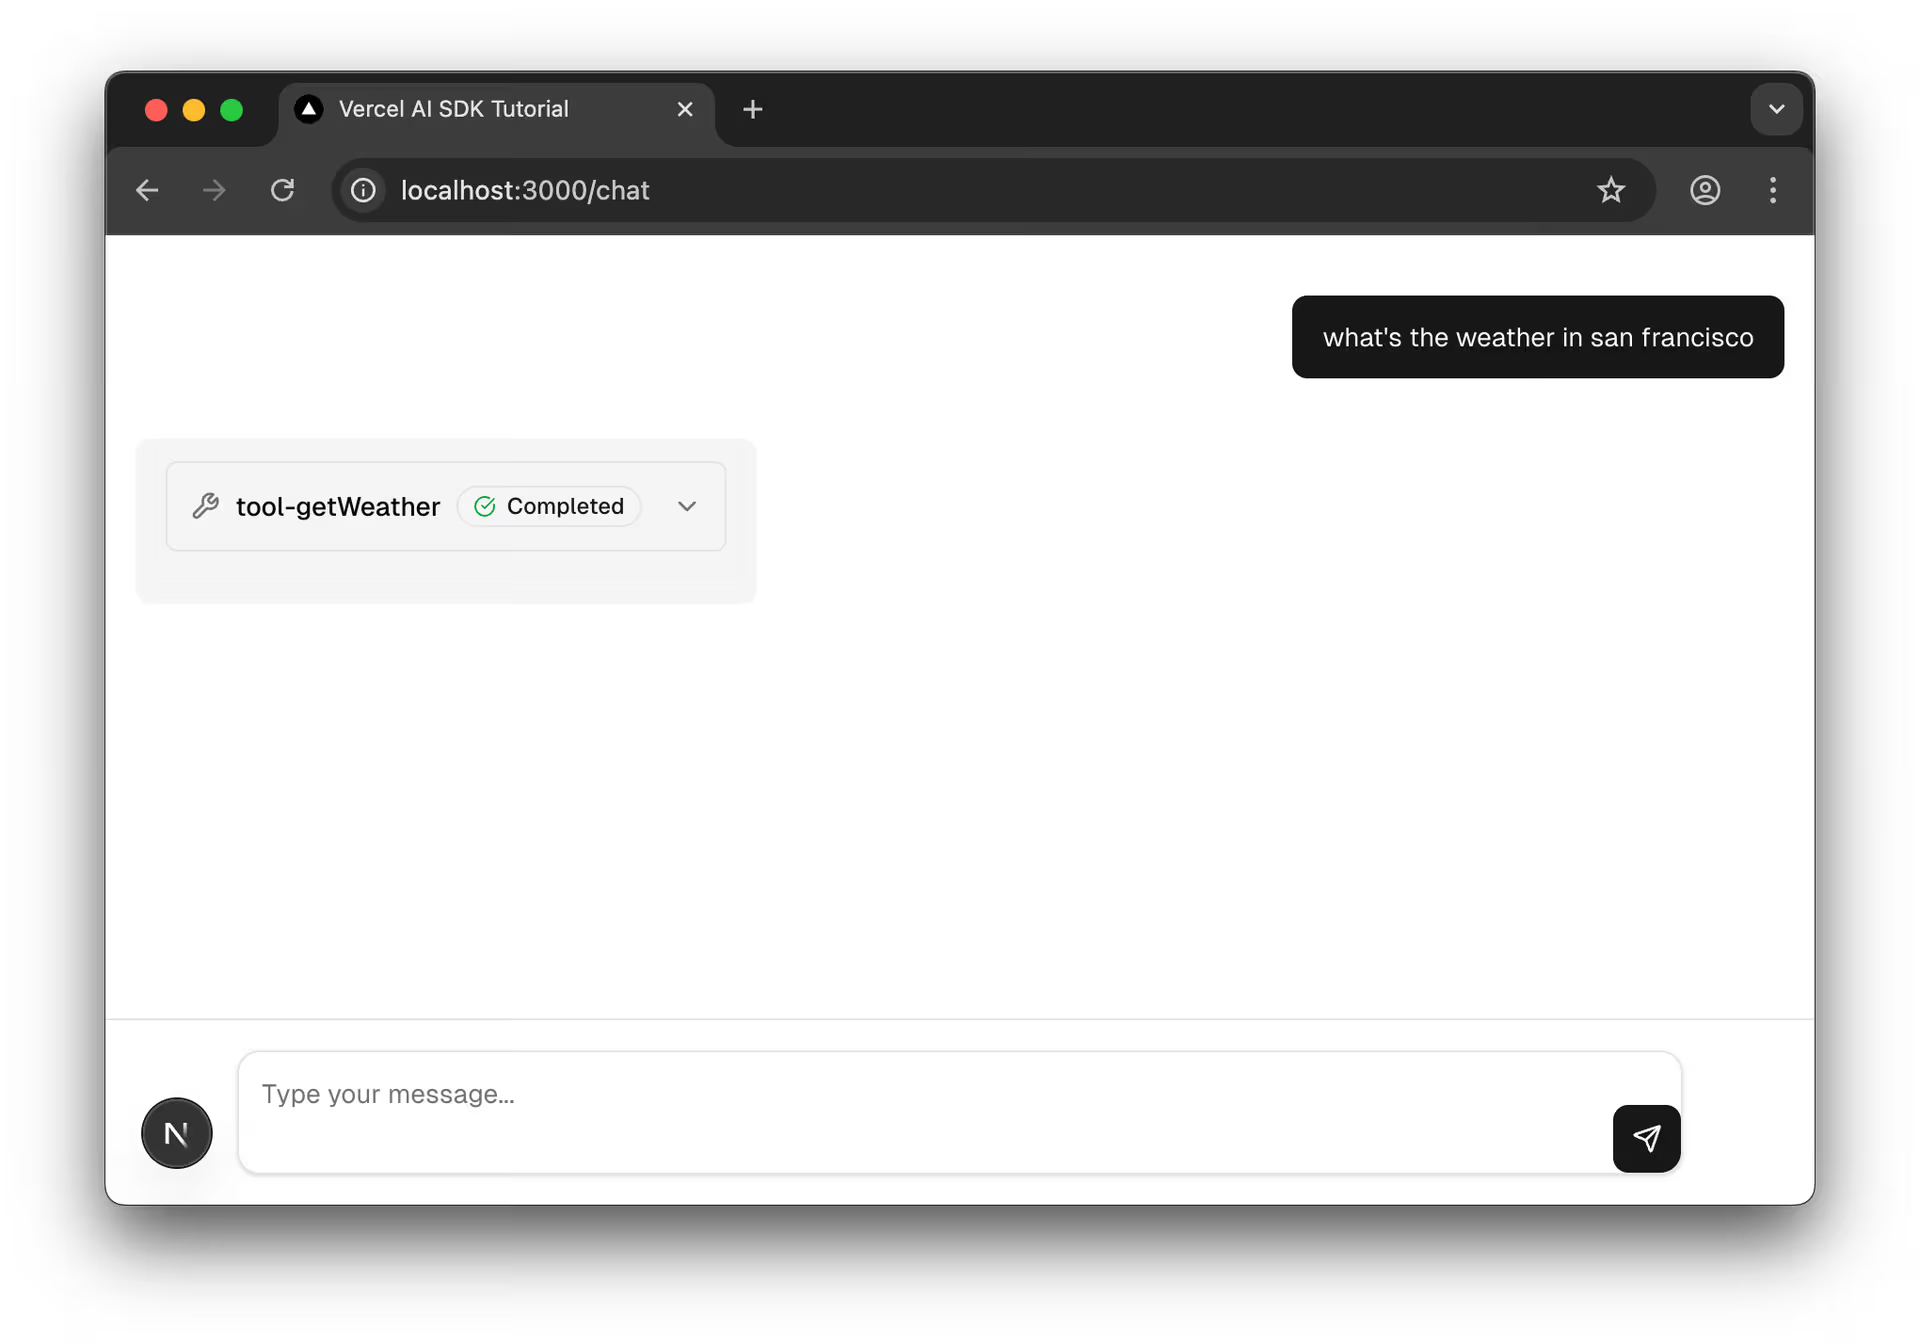
The Elements components automatically handle loading states, errors, and formatting - much better than raw JSON!
Start your dev server:
bash
Navigate to http://localhost:3000/chat and ask: "What's the weather in San Francisco?"
You should now see:
Why No Natural Language Response?
Notice you only see the tool output - no AI explanation of the weather data. By default, the AI stops after executing a tool and returns the raw results.
To get the AI to provide a natural language response that synthesizes the tool data (like "The weather in San Francisco is 19°C and cloudy"), you need to enable multi-step conversations. We'll cover this in the next lesson!
You've given your chatbot superpowers with tool calling:
tool helper defines what tools can do with description, parameters, and executetools property - Makes tools available to the modelStrengthen your tool-calling implementation with these security-focused resources:
Your model can now call a single tool and provide responses. But what if you need multiple tools in one conversation? Or want to display rich UI components instead of just text?
The next lesson explores Multi-Step Conversations where the AI can chain multiple tool calls together, and Generative UI to render beautiful interactive components directly in the chat.
Mark this chapter as finished to continue
Mark this chapter as finished to continue